Article #4
This is the fourth article in this series about building strawbale homes. Many times we focus on the technical aspect of building and forget about why we build this way. We will try to include photographs of finished strawbale homes or details within homes so you can see the beauty in these strong buildings.
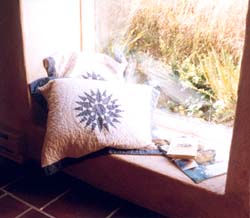
Because the walls are two feet thick, it is possible to make wonderful window seats built right into the walls that look very natural as in the photograph above. Just add pillows or cushions, coffee and a good book. We loved sitting and looking out this window to the forest behind our house. Nature and all the wildlife can be observed if we take the time to slow down and look. This is part of strawbale building also, don't forget to nourish the soul.
Raising the Walls - continued
In article #3 we showed several photographs of the wall going up during a workshop and how hectic it can get. Pinning bales is an integral part of your home's stability and can easily be overlooked. Someone needs to check this - that's why we recommend wall captains for each wall. Starting with the first course, all corners must be pinned together. One method is to use rebar bent into a "U" shape approximately 2' along the base with 6"-10" legs. We recommend #3 rebar because it is easier to make the tight bends of the "U". This pin can easily be pushed into the tops of the two corner bales to secure them together.
It is advisable to have all window and door frames complete and ready to install on the work site before you have your workshop. This will make your wall raising go much smoother and faster. Preparation of the frames also includes corner braces so everything stays square during installation and further bale stacking.
Corner braces can be made from any kind of scrap wood on your site, or salvaged from past projects as long as it is strong enough to keep everything in place. We like to brace as many corners as possible, with some on the inside and some on the outside. We think that two is a minimum if they are fairly large.
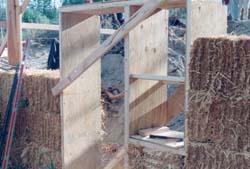
This photograph shows a window/door frame combination installed with several courses of bales stacked in place. Keep in mind that stacking the bales should start at your door and window openings as well as your corners. Always stack towards the center away from your openings and don't force bales into your walls. A nice snug fit will help keep your frames in place and square. Too much cramming and jamming of bales in the wall can cause your corner posts to move or your window/door frames to go out of square. The wall raising will go quickly, make sure your wall captains know how snug the bales should be and that they check each course.
When the 4th course is complete it's time to pin everything together. This is the time to inspect the wall to insure it is straight and that there are no bales sticking out where they shouldn't. Line up all bales - use a large sledge hammer to move stubborn bales. Some people have made "bale whackers" using a sledge hammer size handle and a large block of wood (4"x8"x12"). This can be great fun! Run a string between your corner posts at each course to be a guide. Each course of bales should have been inspected and aligned before the next course went on top, this is an extra check.
Once you are happy that all the bales are ready to be pinned it's time to pound rebar. We recommend using #4 rebar to pin the bales. Some people have used bamboo and wood stakes and they work well; however, if you have had to convince your building official that the strawbale walls are really safe, then they will usually prefer rebar. As long as your building official is satisfied with your choice, use the material you prefer. We will talk about using rebar since it is widely available at local lumber yards and inexpensive. The added stiffness of #4 rebar is suggested here rather than the flexibilty of the #3 used for the corner "U" pins.
Tools to aid in pounding rebar are illustrated in "Build It With Bales" (Buy this book at the beginning of your planning and read it.) During the wall raising assign two people to cut rebar in 5' lengths. You will need 2 pieces for each full bale (if you have 30 bales around the house, you need 60 pieces.) This rebar gets pounded down through all 4 courses tying every bale to the ones above and below.
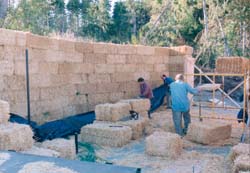
This procedure will be repeated for every course upward. If your walls are 6 bales high, you will need another 120 pieces of rebar. the photograph above shows a 7 bale high wall ready to be covered in plastic at the end of a day. This wall has a 30 degree bend in the middle of it.